How to Properly Pack Your Backpack for Comfort and Balance
Discover how to properly pack your backpack for comfort and balance. Learn to distribute weight evenly and prevent back pain with our expert guide.
Discover how to properly pack your backpack for comfort and balance. Learn to distribute weight evenly and prevent back pain with our expert guide.
Understanding Backpack Weight Distribution for Comfort
Let's face it, a poorly packed backpack can ruin your day. Whether you're a student lugging textbooks, a professional carrying a laptop and documents, or a traveler exploring new cities, the way you distribute weight in your backpack significantly impacts your comfort and well-being. Improper weight distribution can lead to back pain, shoulder strain, and even poor posture. So, how do you ensure your backpack is packed for optimal comfort and balance? This guide will walk you through the essential steps.
Choosing the Right Backpack Size and Fit
Before you even start packing, make sure you have the right backpack for your needs. Consider the capacity (measured in liters) and the fit. A backpack that's too large will encourage you to overpack, while one that's too small won't hold everything you need. Also, pay attention to torso length, not just overall height. Many backpacks come in different sizes (S, M, L) to accommodate varying torso lengths. When trying on a backpack, load it with some weight to simulate real-world conditions. The hip belt should rest comfortably on your hip bones, and the shoulder straps should sit snugly on your shoulders without digging in. The load lifter straps (if present) should angle upward from your shoulders to the top of the pack, helping to pull the weight closer to your body.
The Layering Method: Packing Heavy Items Close to Your Back
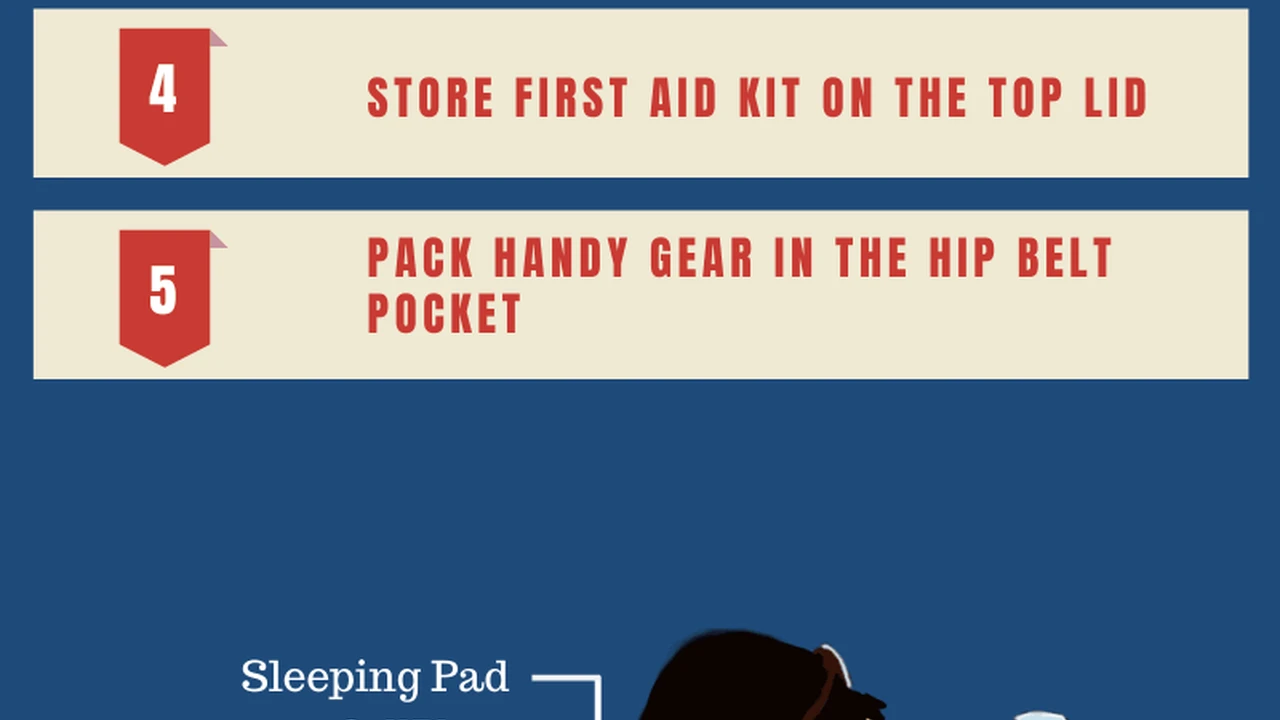
The key to comfortable backpack packing is the layering method. This involves placing heavier items closer to your back and lighter items further away. This keeps the center of gravity close to your body, reducing strain and improving balance. Here's the breakdown:
- Bottom Layer: Place lighter, bulkier items like sleeping bags (if you're hiking), extra clothing, or soft items that won't be damaged by compression at the bottom of the pack.
- Middle Layer (Close to Your Back): This is where you put the heaviest items, such as textbooks, laptops, heavy books, or a water reservoir. The closer these items are to your back, the less strain you'll feel.
- Middle Layer (Away from Your Back): Place medium-weight items like lunch containers, notebooks, or smaller electronics in this section.
- Top Layer: Store frequently needed items like snacks, a rain jacket, a first-aid kit, or your phone in the top compartment or easily accessible pockets.
Specific Product Recommendations and Usage Scenarios
Let's look at some specific product recommendations and how they fit into different usage scenarios:
For Students:
Students need backpacks that can carry heavy textbooks, laptops, and other school supplies. Here are a couple of options:
- Osprey Packs Radial 26: This backpack is designed for commuting and everyday carry. It features a suspended mesh back panel for ventilation, a dedicated laptop compartment, and plenty of pockets for organization. Usage Scenario: Ideal for students who bike or walk to school and need a comfortable, well-ventilated backpack. Price: Around $180.
- JanSport Big Student Backpack: A classic and affordable option with two large main compartments, a front utility pocket with an organizer, and a padded back panel. Usage Scenario: Perfect for students on a budget who need a durable and spacious backpack for carrying textbooks and other essentials. Price: Around $45.
For Professionals:
Professionals need backpacks that are stylish, functional, and can protect their laptops and documents.
- Timbuk2 Authority Pack: This sleek and professional backpack features a dedicated laptop compartment, multiple internal pockets for organization, and a comfortable padded back panel. Usage Scenario: Ideal for professionals who commute to work and need a stylish and functional backpack for carrying their laptop, documents, and other essentials. Price: Around $130.
- Peak Design Everyday Backpack 20L: A versatile and well-designed backpack with customizable dividers, a dedicated laptop compartment, and a sleek, minimalist design. Usage Scenario: Perfect for photographers, creatives, and professionals who need a backpack that can adapt to different needs. Price: Around $260.
For Travelers:
Travelers need backpacks that are durable, comfortable, and can hold all their essentials for extended trips.
- Osprey Atmos AG 65: A comfortable and well-ventilated backpacking pack with a suspension system that distributes weight evenly. Usage Scenario: Ideal for backpacking trips and extended travel. Price: Around $300.
- Tortuga Setout Laptop Backpack 45L: A travel-friendly backpack with a clamshell opening, a dedicated laptop compartment, and plenty of internal pockets for organization. Usage Scenario: Perfect for carry-on travel and weekend getaways. Price: Around $200.
Securing Your Load: Compressing and Stabilizing Your Backpack
Once you've packed your backpack, it's important to secure the load to prevent it from shifting around. Use compression straps to compress the contents of the pack and stabilize the load. These straps are typically located on the sides and bottom of the pack. Tighten them to pull the load closer to your body and prevent it from shifting. If your backpack has internal compression straps, use them to compress the contents within the main compartment.
Proper Posture and Lifting Techniques
Even with a properly packed backpack, it's important to maintain good posture and use proper lifting techniques to prevent injury. When lifting your backpack, bend at your knees and keep your back straight. Use your leg muscles to lift the pack, rather than straining your back. Once the pack is on your back, adjust the shoulder straps and hip belt to distribute the weight evenly. Stand tall and avoid slouching. Take breaks frequently to rest your shoulders and back.
Common Packing Mistakes to Avoid
Here are some common packing mistakes to avoid:
- Overpacking: Resist the urge to pack everything you think you might need. Stick to the essentials and prioritize lightweight items.
- Packing heavy items too far from your back: This can throw off your balance and strain your back.
- Ignoring compression straps: These straps are essential for stabilizing the load and preventing it from shifting.
- Not adjusting the shoulder straps and hip belt properly: This can lead to discomfort and uneven weight distribution.
- Forgetting to pack a rain cover: Protect your belongings from rain and moisture with a waterproof rain cover.
Backpack Maintenance Tips for Longevity
To keep your backpack in good condition and extend its lifespan, follow these maintenance tips:
- Clean your backpack regularly: Wipe down the exterior with a damp cloth to remove dirt and grime.
- Air out your backpack after each use: This helps to prevent mold and mildew growth.
- Store your backpack in a dry, cool place: Avoid storing it in direct sunlight or humid environments.
- Repair any damage promptly: Fix any tears or broken zippers to prevent further damage.
- Use a backpack liner: This helps to protect the interior of your backpack from dirt and spills.
Alternative Packing Strategies for Specific Needs
Depending on your specific needs, you may need to adjust your packing strategy. For example:
- For hiking: Pack essential gear like water, food, a map, a compass, and a first-aid kit.
- For travel: Pack lightweight clothing, toiletries, and any necessary travel documents.
- For school: Pack textbooks, notebooks, a laptop, and other school supplies.
- For work: Pack a laptop, documents, and any other work-related items.
Backpack Material Comparison: Nylon vs Canvas
The choice of backpack material significantly impacts durability, weight, and weather resistance. The most common materials are nylon and canvas. Let's compare them:
Nylon Backpacks:
- Pros: Lightweight, durable, water-resistant, easy to clean.
- Cons: Can be more expensive than canvas, less breathable.
- Best For: Outdoor activities, travel, everyday use.
Canvas Backpacks:
- Pros: Affordable, durable, breathable, stylish.
- Cons: Heavier than nylon, less water-resistant, can be harder to clean.
- Best For: School, casual use, fashion.
Ultimately, the best material for your backpack depends on your individual needs and preferences. Consider the pros and cons of each material before making a decision.
By following these tips, you can pack your backpack for optimal comfort and balance, preventing back pain and ensuring a more enjoyable experience, whether you're heading to school, work, or on an adventure!
:max_bytes(150000):strip_icc()/277019-baked-pork-chops-with-cream-of-mushroom-soup-DDMFS-beauty-4x3-BG-7505-5762b731cf30447d9cbbbbbf387beafa.jpg)